RETOUCHING FOR BEAUTY
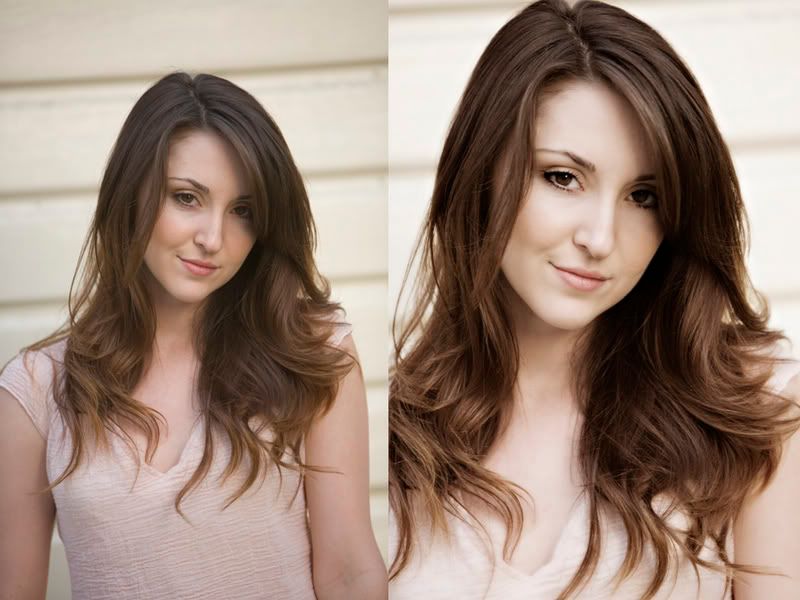
I checked with my friend Jackie to make sure she was okay with me using her as an example for a little lesson I've been wanting to do about how to retouch faces for beauty-type images. Obviously she said yes and since she's a beautiful girl anyway, it was very easy just to do a few things to make her headshots "pop" even more.

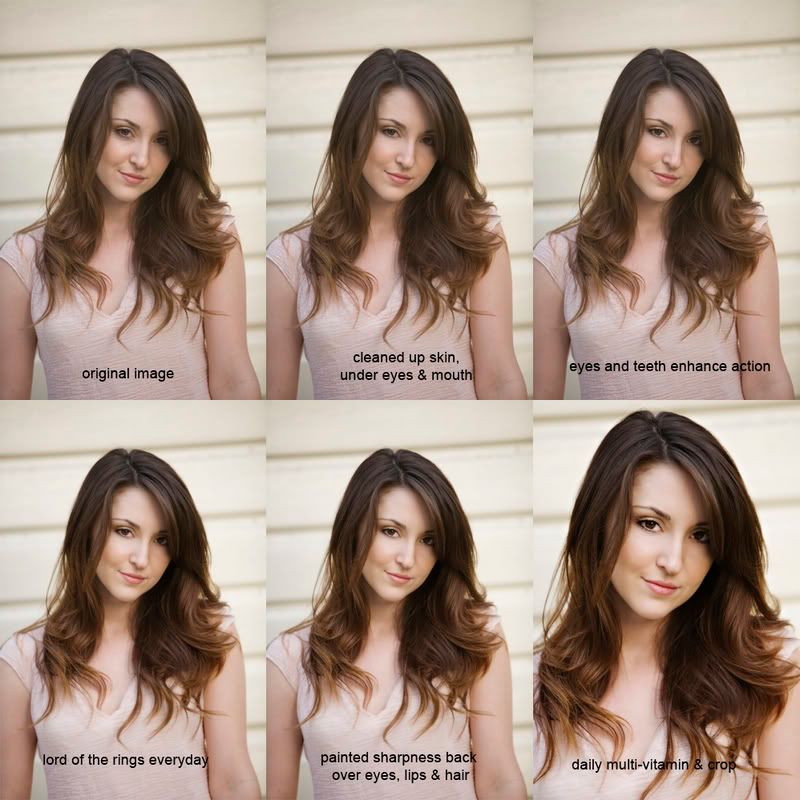
The first thing I did for this image (which I shot in raw on a Canon 5D with a 70-200 f2.8 lens) was to take a look to see what I could do to enhance it. The first thing I usually do with women (and we all have some issues) is to see what the skin needs in order to improve the overall image. That usual entails a little bit of work under the eyes and maybe cleaning up a few minor blemishes and softening every so slightly around the mouth. So on this image, I used the healing toolbrush to fix any little dots on her skin. Then I set the cloning stamp at about 15% opacity and sampled the skin on the cheek area. Then I ran it back and forth under her eyes a few times to take away any darkness and to soften the lines under the eyes just slightly. You want the person to look like themselves, only well rested and maybe a couple years younger. This was very slight with Jackie since she is young and beautiful to begin with.

To proceed from here you need to have Kevin Kubota's Photoshop actions, you can get them at http://kubotaworkshops.com/store/catalog/index.html. You can also do everything on here the long way in PS if you're REALLY good (which I'm not) but it also takes longer. I recommend investing in actions or making your own in order to save lots of time.
So, the next thing I did was to take a look at her eyes, I wanted them to pop out at you a little bit more. So I used the "eyes & teeth enhance" action to whiten and desaturate her eyes just a little bit, then I reduced the opacity of that layer a little bit until I thought it looked natural. Using the same action, I also darkened her eyeliner just slightly. Then flattened the image.
Next, I applied the "lord of the rings everyday" action which is one of my favorites. This applies a softening look to the whole image. However, I only want her skin to look soft and creamy and not the whole image. So, I selected the eraser brush set at about 40% opacity and then erased the softening wherever I wanted the image to be sharp...her eyes, eybrows, lips and hair. At this point the real retouching is done and I just wanted to add a tiny bit of contrast and sharpening to the image. I do this with the "daily multivitamin" action. At this point the image looks fabulous but I also wanted to crop in a little closer to improve the composition and so that the focus is on just her face.
In the version at the top, I also took it one step further by adding Marcus Bell's "sepia halftone" action to bring the color down a little bit. Marcus is an incredible Australian photographer. His actions are available for sale at http://www.studioimpressions.com.au
Feel free to ask questions and leave a comment if you're interested in seeing more lessons like this...
I checked with my friend Jackie to make sure she was okay with me using her as an example for a little lesson I've been wanting to do about how to retouch faces for beauty-type images. Obviously she said yes and since she's a beautiful girl anyway, it was very easy just to do a few things to make her headshots "pop" even more.

The first thing I did for this image (which I shot in raw on a Canon 5D with a 70-200 f2.8 lens) was to take a look to see what I could do to enhance it. The first thing I usually do with women (and we all have some issues) is to see what the skin needs in order to improve the overall image. That usual entails a little bit of work under the eyes and maybe cleaning up a few minor blemishes and softening every so slightly around the mouth. So on this image, I used the healing toolbrush to fix any little dots on her skin. Then I set the cloning stamp at about 15% opacity and sampled the skin on the cheek area. Then I ran it back and forth under her eyes a few times to take away any darkness and to soften the lines under the eyes just slightly. You want the person to look like themselves, only well rested and maybe a couple years younger. This was very slight with Jackie since she is young and beautiful to begin with.

To proceed from here you need to have Kevin Kubota's Photoshop actions, you can get them at http://kubotaworkshops.com/store/catalog/index.html. You can also do everything on here the long way in PS if you're REALLY good (which I'm not) but it also takes longer. I recommend investing in actions or making your own in order to save lots of time.
So, the next thing I did was to take a look at her eyes, I wanted them to pop out at you a little bit more. So I used the "eyes & teeth enhance" action to whiten and desaturate her eyes just a little bit, then I reduced the opacity of that layer a little bit until I thought it looked natural. Using the same action, I also darkened her eyeliner just slightly. Then flattened the image.
Next, I applied the "lord of the rings everyday" action which is one of my favorites. This applies a softening look to the whole image. However, I only want her skin to look soft and creamy and not the whole image. So, I selected the eraser brush set at about 40% opacity and then erased the softening wherever I wanted the image to be sharp...her eyes, eybrows, lips and hair. At this point the real retouching is done and I just wanted to add a tiny bit of contrast and sharpening to the image. I do this with the "daily multivitamin" action. At this point the image looks fabulous but I also wanted to crop in a little closer to improve the composition and so that the focus is on just her face.
In the version at the top, I also took it one step further by adding Marcus Bell's "sepia halftone" action to bring the color down a little bit. Marcus is an incredible Australian photographer. His actions are available for sale at http://www.studioimpressions.com.au
Feel free to ask questions and leave a comment if you're interested in seeing more lessons like this...
Labels: headshot, lesson, Retouching


6 Comments:
I wish I could just have all these "actions" fixing me up everyday in real life!!!
J- I am still reading mama! Just all at once b/c baby Ryane is keeping me soooo busy! Loved catching up and hearing all the fun things you are doing. Can't wait to see you this week!
Mary
A philosophical question for my favorite photographer. Do you feel that retouching photos in this way adds to and reaffirms unrealistic standards of beauty which are odd, unachievable and unhealthy? Love the Blog.
A good question. My best answer is that I feel that my job is to make each individual client feel as beautiful as possible. That's why they come to me. So I prefer to serve each person to the best of my ability rather than to worry about "unrealistic standards of beauty". This is certainly a problem today but seeing as how my clients are not necessarily role models or on magazine covers, I don't really think there is anything wrong with making them feel great about how they look. On another note I'm not shaving pounds off of people or slimming their thighs to make them look like models. But lightening some dark shadows and softening the skin isn't too evil...I think. :) I guess it depends on who you ask. Thanks for the comment, I appreciate it!
Hi Justine, I really like the subtle retouches that were made - and one thing I love about your photography is your ability to capture the soul of the person as well.
I am not a photographer, but I am a graphic designer and I use Photoshop all the time. I do grapple with the ethics of retouching photographs. I fairly routinely retouch photographs, but it is mostly because of problems with shadows, or lighting, or giving things a slightly different look to fit in with a certain style.
I have also been known to use the Liquefy tool a few times to slim an accidental double chin, or the heal brush to smooth over a prominent scar or pimple, so its certainly something interesting.
What is important, I think is that we are mindful while we are doing it. I see no problem with maximising light or colour or fixing a blemish, but many photographs are so ridiculously over-Photoshopped (particularly in the entertainment industry), that the people in magazines are nothing but caricatures of themselves.
I guess with more savvy audiences now, its a good thing that people do not automatically believe what they see in photographs - and photography, especially digital photography, should be viewed as an art and a text more than a literal representation anyway.
Sorry for the novel, just thought it was interesting.
And if there was anyone I would want to photograph me, it would be Justine. Her work is amazing.
your sensitivity and eye to your surroundings and subject make your
pictures exciting to watch. i'll
be checking in on your blog from time to time. you photographed my friend
son's wedding. what camera do you use?
Post a Comment
Subscribe to Post Comments [Atom]
<< Home